There are 3 harnesses for the 240z. The engine bay harness, the dash harness, and the body harness.
There are minor changes for the 1970-1972 Datsun 240z, big changes occurred in the 1973 Datsun 240z. I see a lot of engine bay harnesses with a short to ground which melts the sheathing on the wires, making the harness useless, and leaving a Z owner scrambling to get a good harness.
I offer Harness Rebuild Services, Click here for details.
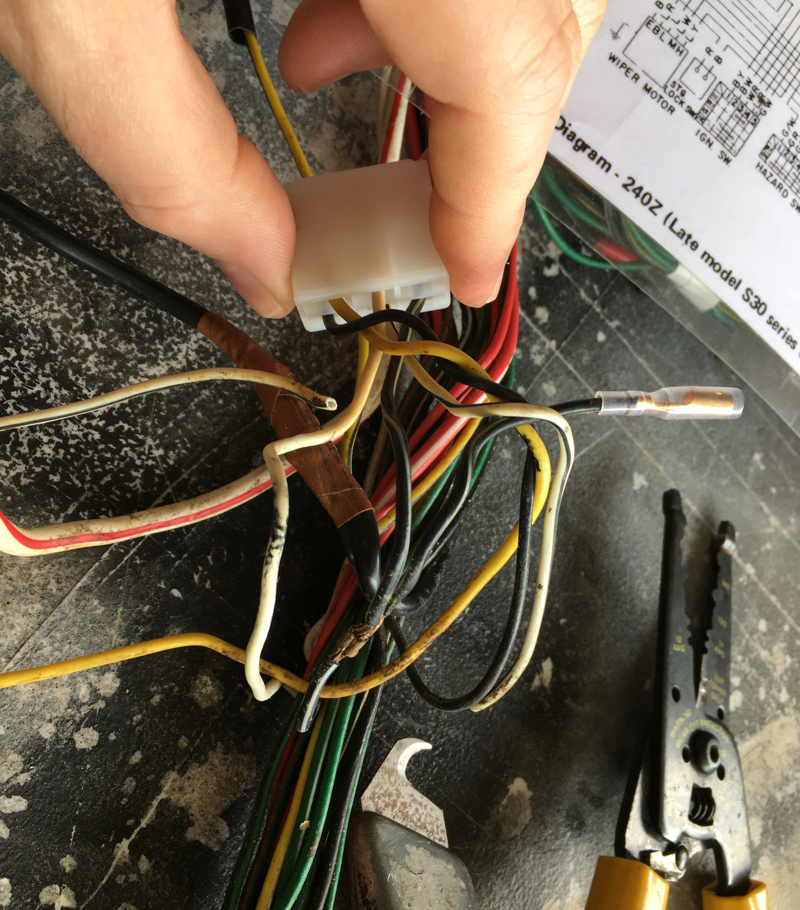
When replacing a harness, you must get the correct harness for your production date. All 3 harnesses connect to each other under the passenger side dash area. The connectors need to match when they all connect. Using the wrong harness can cause shorts and wrong connections. Datsun did major changes to the harnesses in 1973, some of the connectors were combined and replaced with 10 terminal connectors.

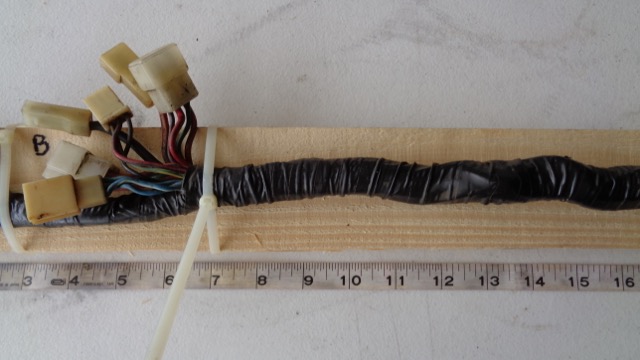
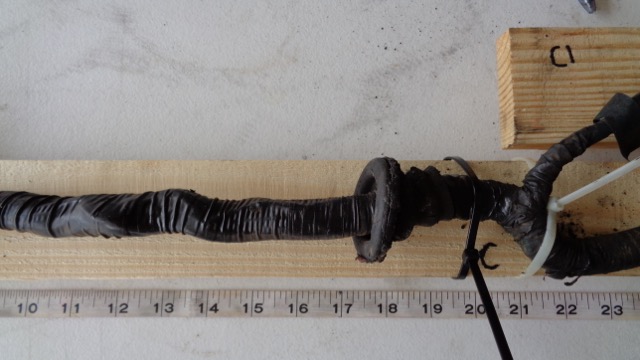
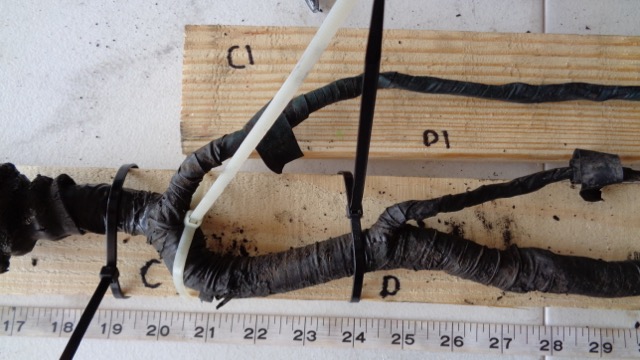
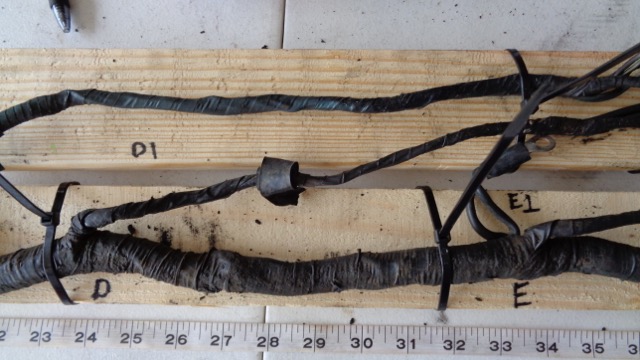
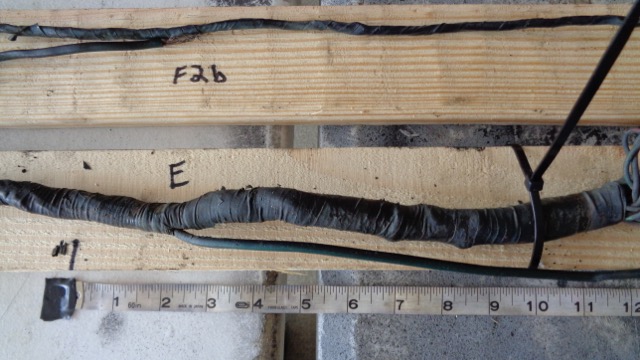
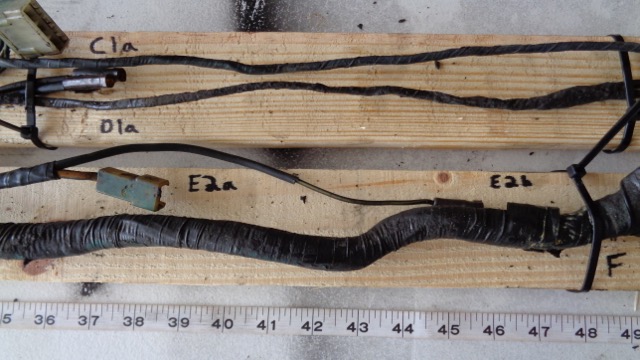
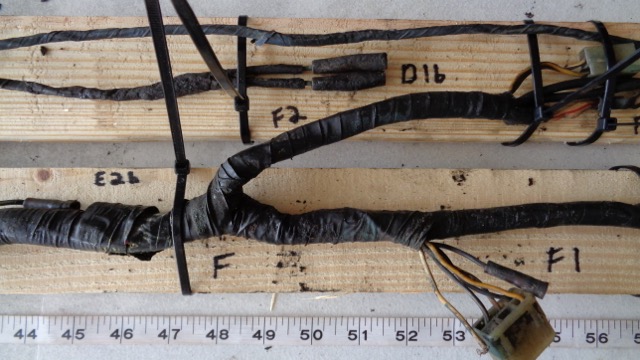
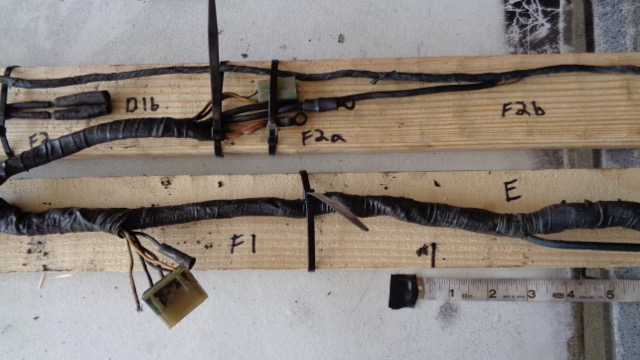
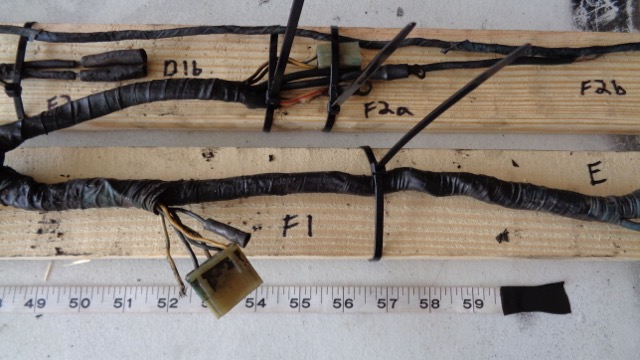
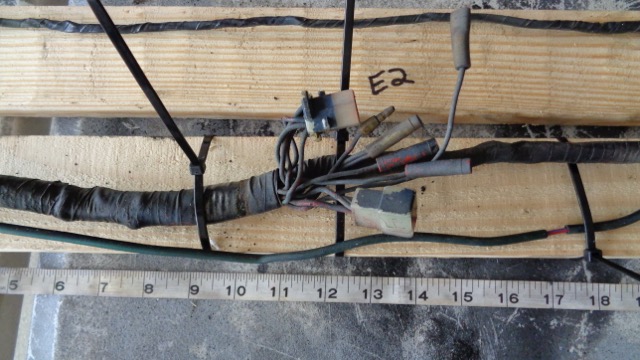
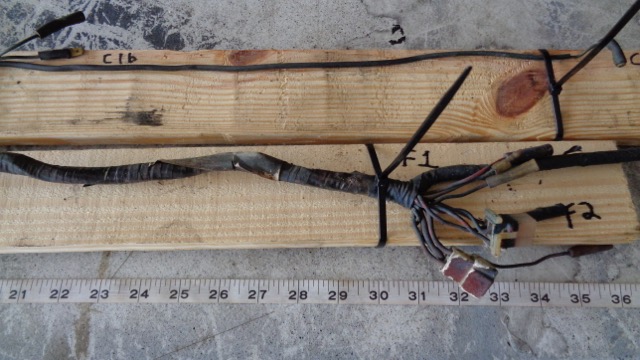
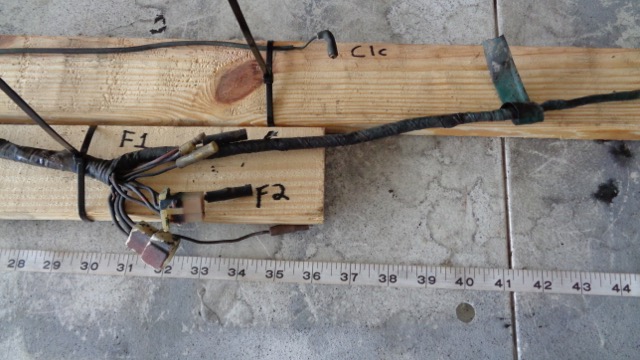
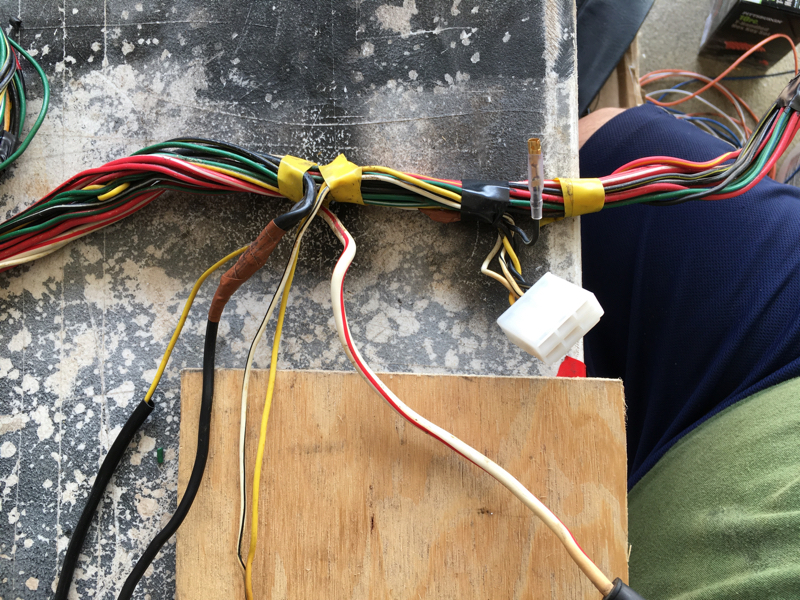
I have rebuilt all of the Datsun 240z Harnesses. Below are pics of how I define the harness, blueprint the harness, and rebuild the harness. I define the harness with Letters and Numbers. The main branch is designated with capital letter, as I move from the beginning (where it connects under dash) towards the end, a new branch is named with the next letter. A sub-branch off from a main branch is given a number. Another branch off a sub-branch is given a lower case letter. I use boards to help me blueprint a harness, please note in the photos the designated branch is defined on the board. If you see writing on the boards, the branch on that board is the correct branch, do not look at the other board and misinterpret the blue print. The actual blueprint shows all the wires and connectors and the naming convention will be defined later.
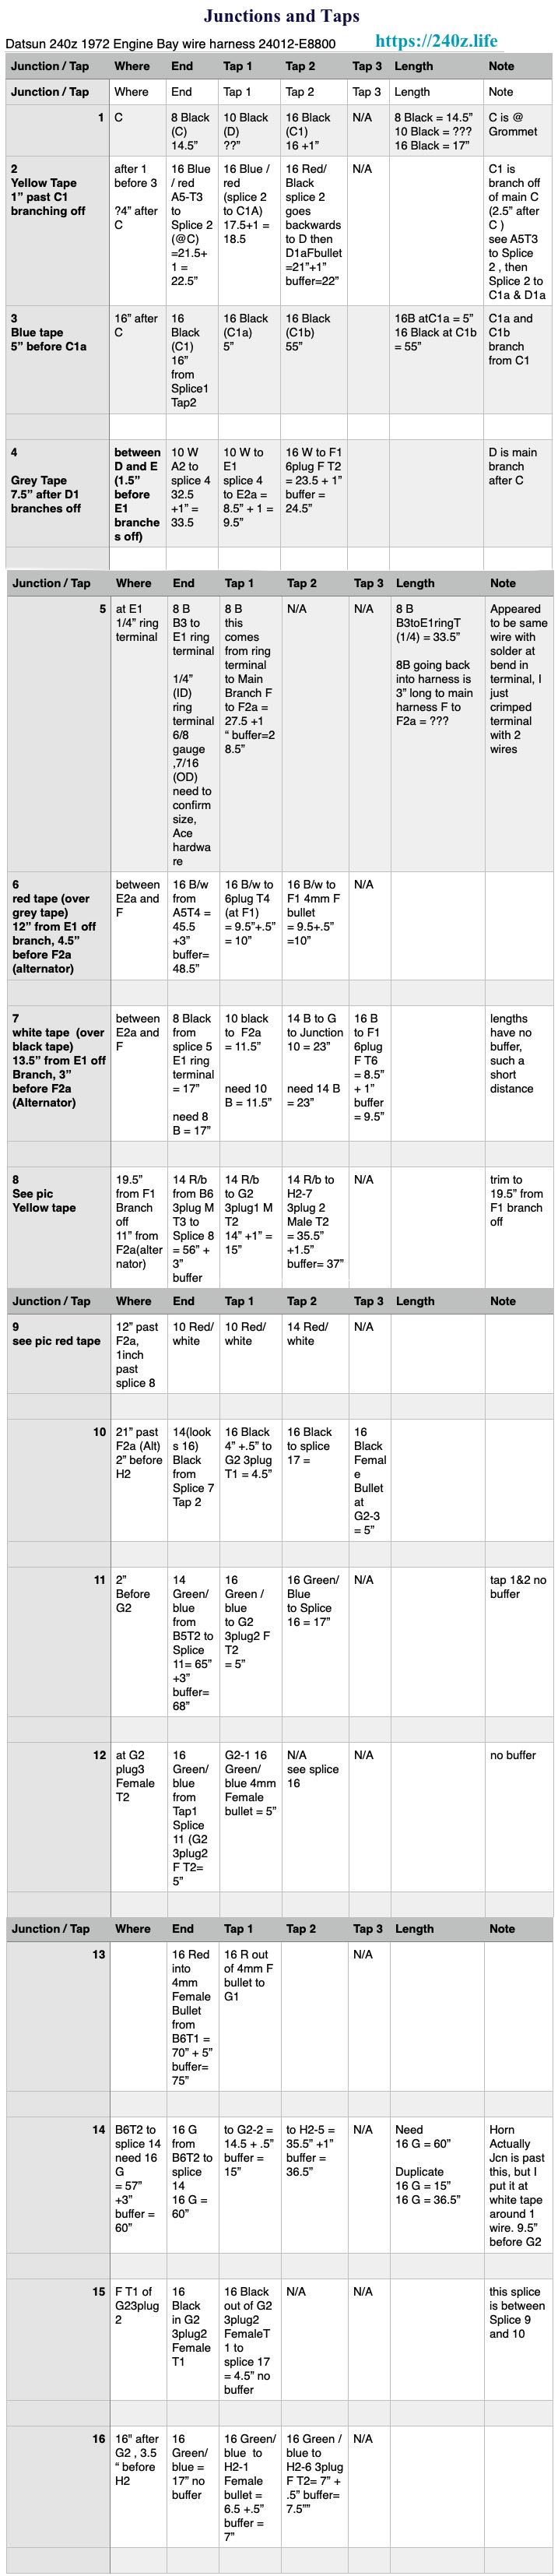
Blueprinting a Datsun 240z 1972 Engine Bay wire harness 24012-E8800


Blueprint Definitions
Wire Color Designations
- B = Black
- W = White
- R = Red
- Y = Yellow
- G = Green
- L = Blue
First letter is Main Color of wire, second letter is the strip color: A Red wire with yellow strip would have the designation RY. I often use a lower case letter for strip.
Connector types and sizes
- The terminals for the plastic connectors are 2.8mm 6.3mm and 7.8mm
- There are spade terminals, male and female usually 6.3mm
- There are 4mm bullet connectors
Connector Naming Convention
- The terminals are defined as you looking at the front of the connector, wires in back.
- There are Male and Female connectors, designated M or F
- The # of terminals in a connector are designated by P and a number,
P3 is a connector plug with 3 terminals

Junctions and Taps
There are 17 Junctions and taps within the harness itself. These are unseen, if harness is wrapped in loom tape. Honestly, you may need to dig around in the wires, look for tiny electrical tape sections. It gets a little confusing, no worries my chart is simple. The “END” is the main wire that is tapped.
The “TAPS” are the wires coming out of junction.
Wiring Harness Notes
A is 3 “ in front of B , 18.5” to Grommet, A is taped at start of B
B is 14.5” to Grommet , B is taped 3.25” towards grommet
Grommet
C is right after Grommet
C1 is branch off of main (C to D)
C1a and C1b branch from C1
C1a is 21” +1” = 22” from Grommet
C1b is 65” +1” = 66” from Grommet
C1c is 60”=20”+1” = 81” from Grommet
C1a and D1a are parallel in alignment
D is main branch after C
D1a is branch off of main (D to E)
D1b is past D1a (same branch)
E is main branch after D
E1 E2a E2b are 3 separate branches that branch off at E, 9” after D1 branches off from D
F is main branch after E
F1 is Branch off of main branch F , branches off 2.5” past F
F1 and main G branch, branch 2.5” off of F
F2 is branch off of main branch F
F2a is Altenator
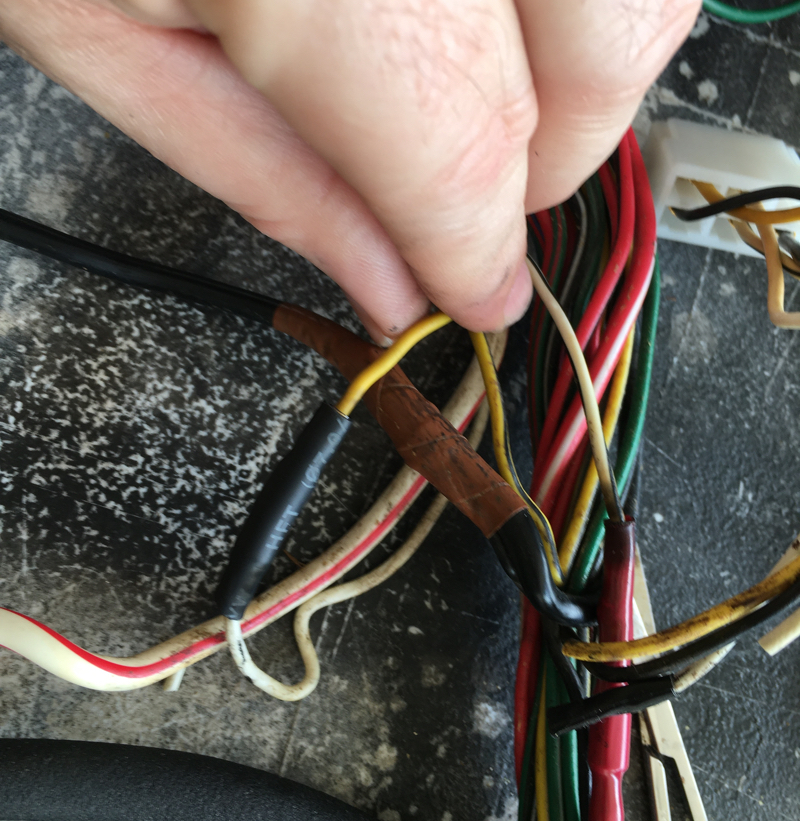
F2b is oil Pressure sending unit, need to be taped separate from F2a, see pics.
G is main Branch from F, 2.5” from F
G2a branch from G
G1 is continuation of Main Branch after G2a branch, where Passenger lights branch off
G2b (actually before G2a) is branch off 11.5” off of F2a (alternator)
no G2a
after G2b branches off main harness continues
G1 is continuation of main branch, branch where passenger lights branch off is G2
Main harness continues to H
18” extra large black sheath between G2 and H2
H2 branch is Driver lights
H1a is temp sensor wire (Y/w)
H1b is Ignition wires 16 B/w, 16 G/w, 16 B/w
Terminate 1 of the 16 B/w to 16 G/w this removes the drop resistor for the points distributor.
Hot B/W (12V) goes to + side of coil,
PLEASE NOTE BOTH B/W ARE PART OF THE SAME CIRCUIT. IF TACHOMETER DOES NOT WORK SWITCH THE B/W CONNECTED TO + COIL WITH B/W CONNECTED TO G/W.
Ignition Circuit upgrade to Datsun 280ZX IC Distributor for 240Z 260Z 280Z
I used the 82 DATSUN 280ZX DISTRIBUTOR with Housing stamp of D6K80-07 Part # 22100 58001
Any non-turbo 1979-1983 DATSUN 280ZX IC DISTRIBUTOR will work.
Terminate 1 of the 16 B/w to 16 G/w this removes the drop resistor for the points distributor. The drop resistor lowers the voltage from 12V to 5V, this then feeds the coil + terminal. When you remove drop resistor, test your coil to see if it can handle the +12V feed. Let the car run at at idle a few minutes, then feel the coil. If it too hot to hold your hand on, you will need to rewire the resistor back into circuit. Stock coils need the drop resistor. New coils are engineered better and may contain oil to keep cool and can handle the +12V feed.
Hot B/W (12V) goes to + side of coil,
PLEASE NOTE BOTH B/W ARE PART OF THE SAME CIRCUIT. IF TACHOMETER DOES NOT WORK SWITCH THE B/W CONNECTED TO + COIL WITH B/W CONNECTED TO G/W.
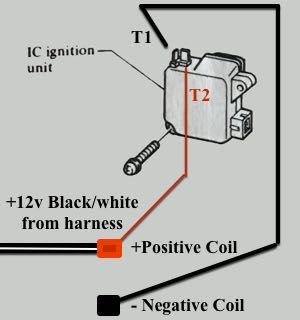
If your coil has multiple terminal connectors, then run wires from terminals on coil to IC unit on Distributor.
If your coil has only 1 terminal per side, install a double bullet connector ( or another connector type) on the B/w wire.
You need Hot B/W (12V) from harness with 2 wires B/w coming out.
1st wire goes to + on coil
2nd wire goes to + on Distributor IC Ignition unit T2 orientation |
Negative Coil wire goes to Negative terminal on Distributor IC Ignition unit T1 orientation –
Datsun 240z 1973 Engine Bay Harness 24012-N3300 Rebuild
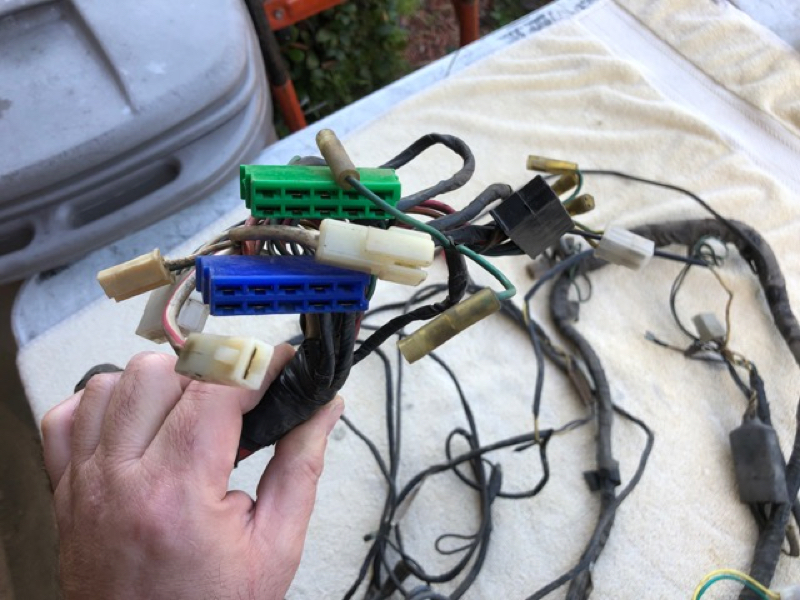
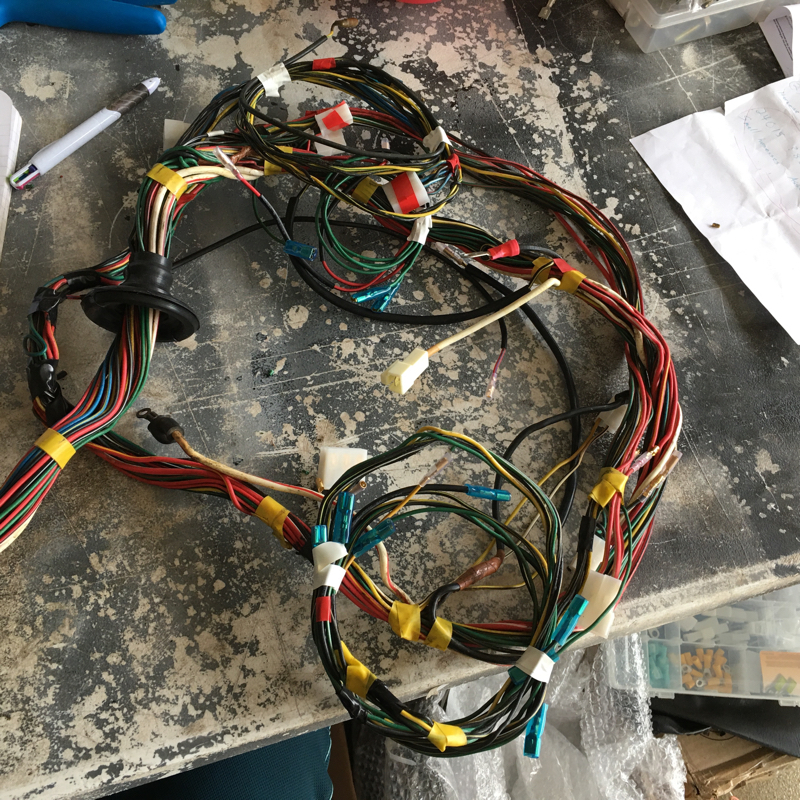
Unrestored Datsun 240z 1973 Engine Bay Harness 24012-N3300
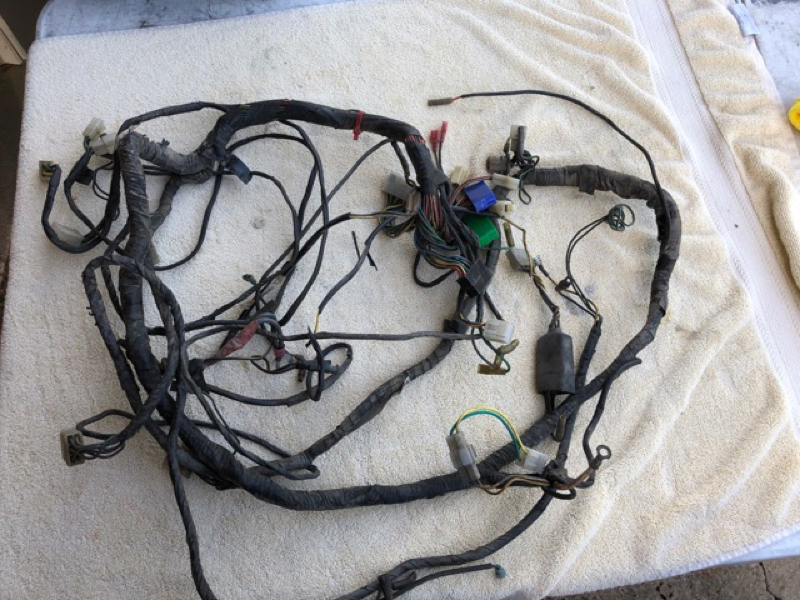
ID Tag Datsun 240z 1973 Engine Bay Harness 24012-N3300 ID Tag

Unrestored Datsun 240z 1973 Datsun 240z 1973 Engine Bay Harness 24012-N3300 Front restored

Datsun 240z 1973 Engine Bay Harness 24012-N3300 Front restored
Restored Harness Front end Firewall Grommet Installed Datsun 240z 1973 Engine Bay Harness 24012-N3300
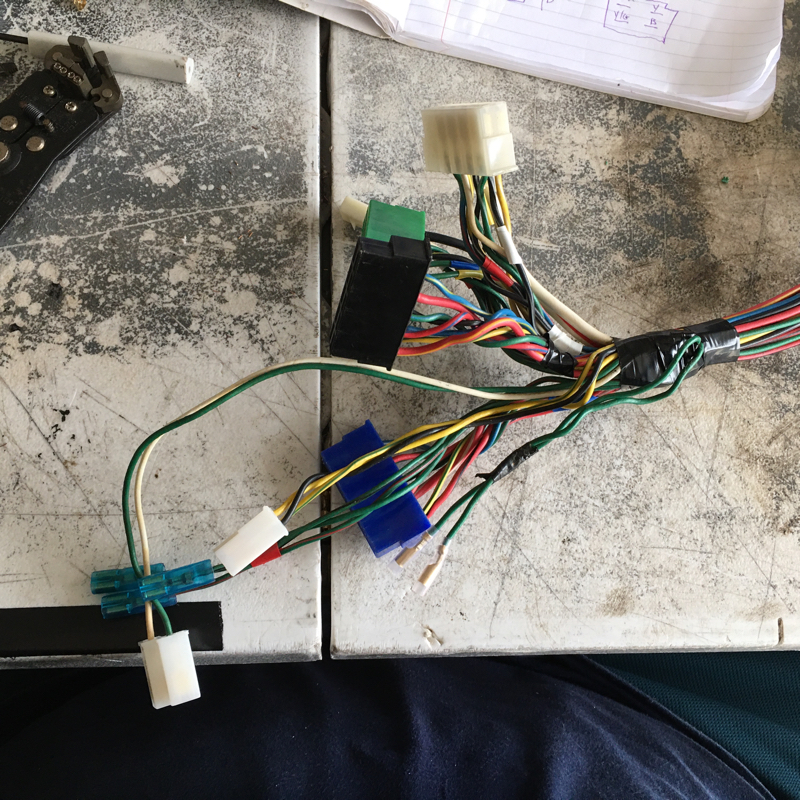
Ground junction Datsun 240z 1973 Engine Bay Harness 24012-N3300 ground junction
Wire color change Datsun 240z 1973 Engine Bay Harness 24012-N3300
Proper Junction wrap Datsun 240z 1973 Engine Bay Harness 24012-N3300
I get fancy with the tape so when I rewrap the harness I can wrap each branch separately and keep the overall appearance as professional and original looking as possible.
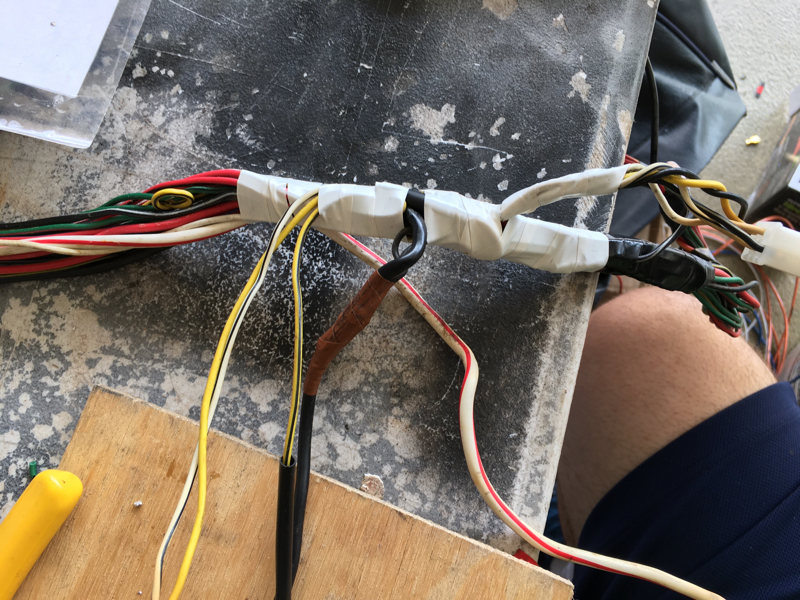
Harness wrap Datsun 240z 1973 Engine Bay Harness 24012-N3300
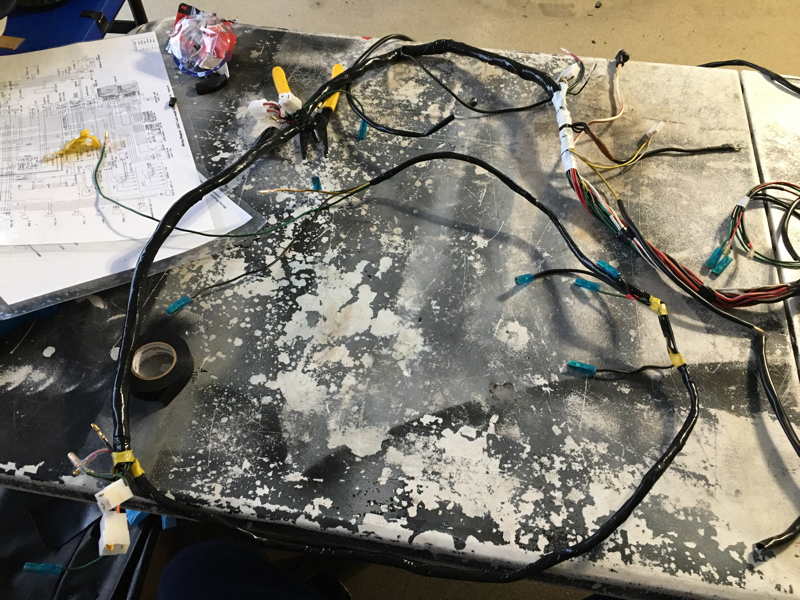
Wrapping the harness properly takes time and patience. Your covering about 40 ft of wire about 3/8″ at a time. Take your time, keep your tape straight and wrap it tight. Start with the front and work towards end. Get your technique and pace established, doing the smaller branches with only a few wires can wear you down. If your hands are getting tired take a break, be patient. I wrap the harness twice, the 2nd time is easier. Because you took the time to wrap it tight and kept the tape straight, not jumbled, crunched or folded
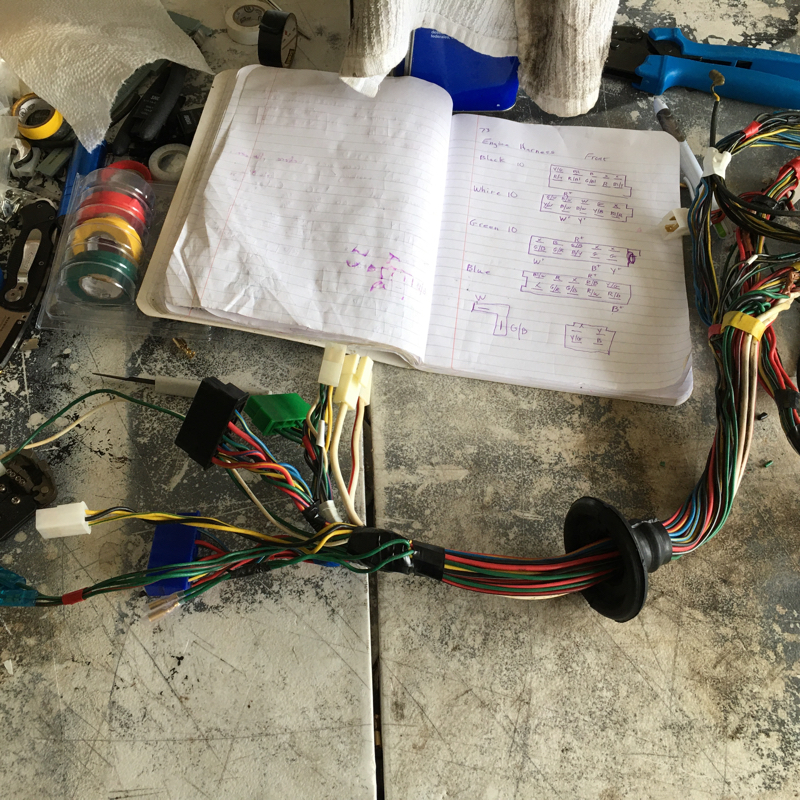
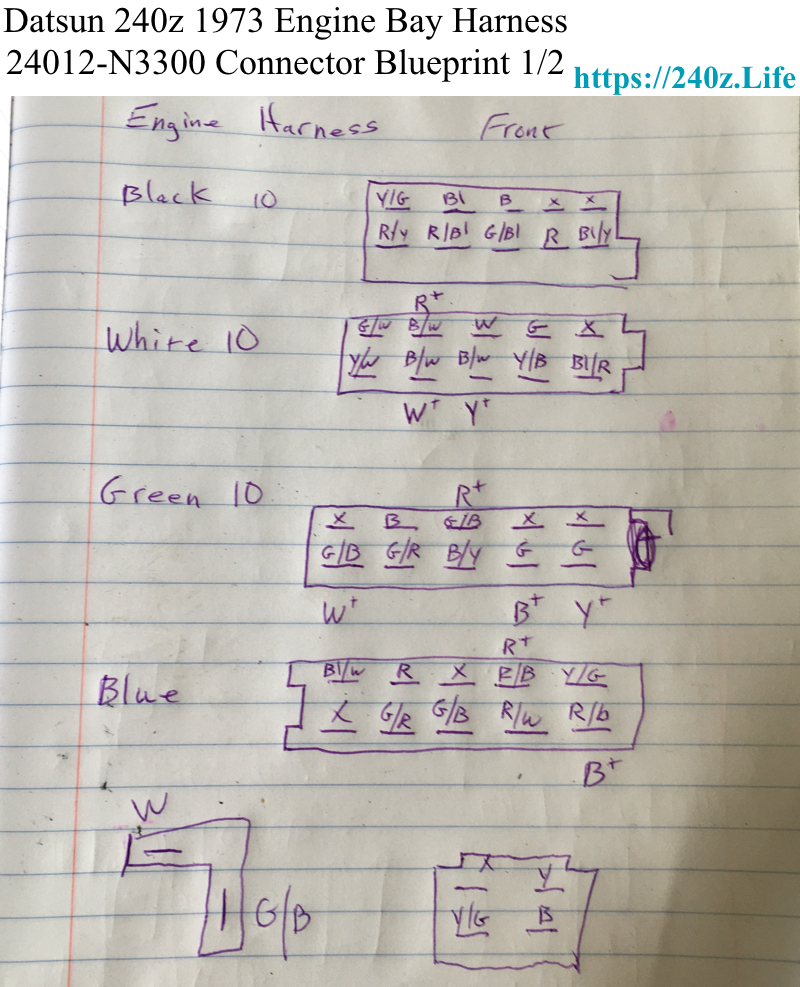
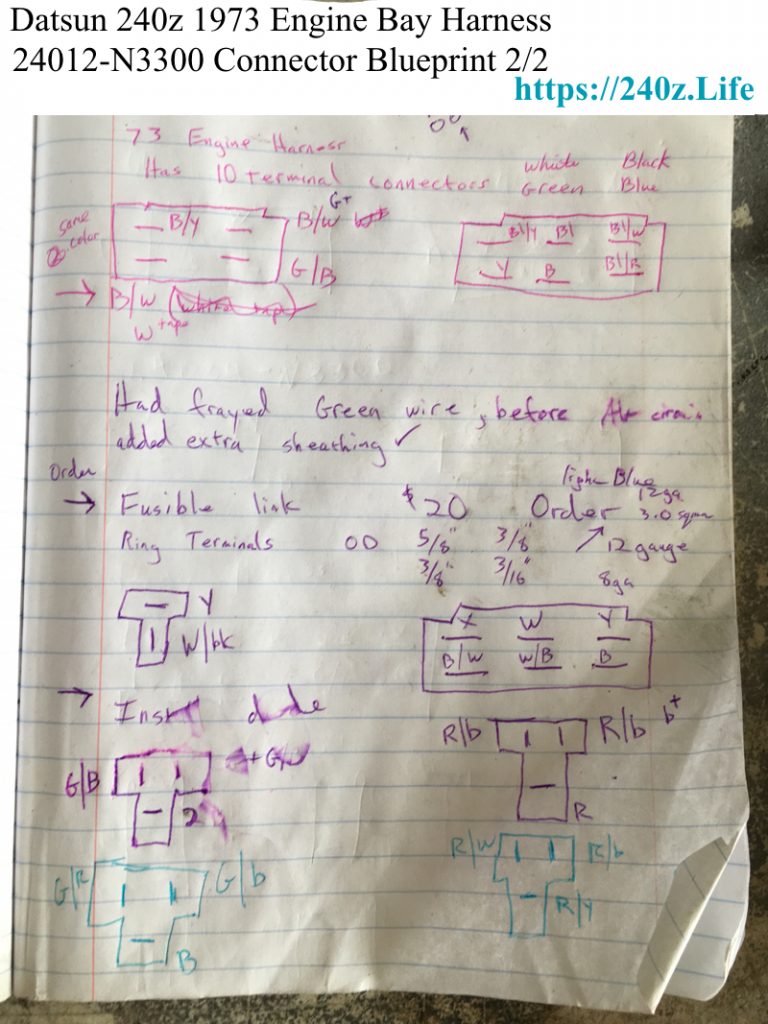
Front Connectors with wires blueprint Datsun 240z 1973 Engine Bay Harness 24012-N3300
All views are looking at front of connector at the terminals, unless noted otherwise. I mark same color wires at a connector with colored electrical tape to differentiate the same colored wires. The color designation for tape is outside the connector.
Datsun 240z Component ID and Descriptions from Factory Service Manuals
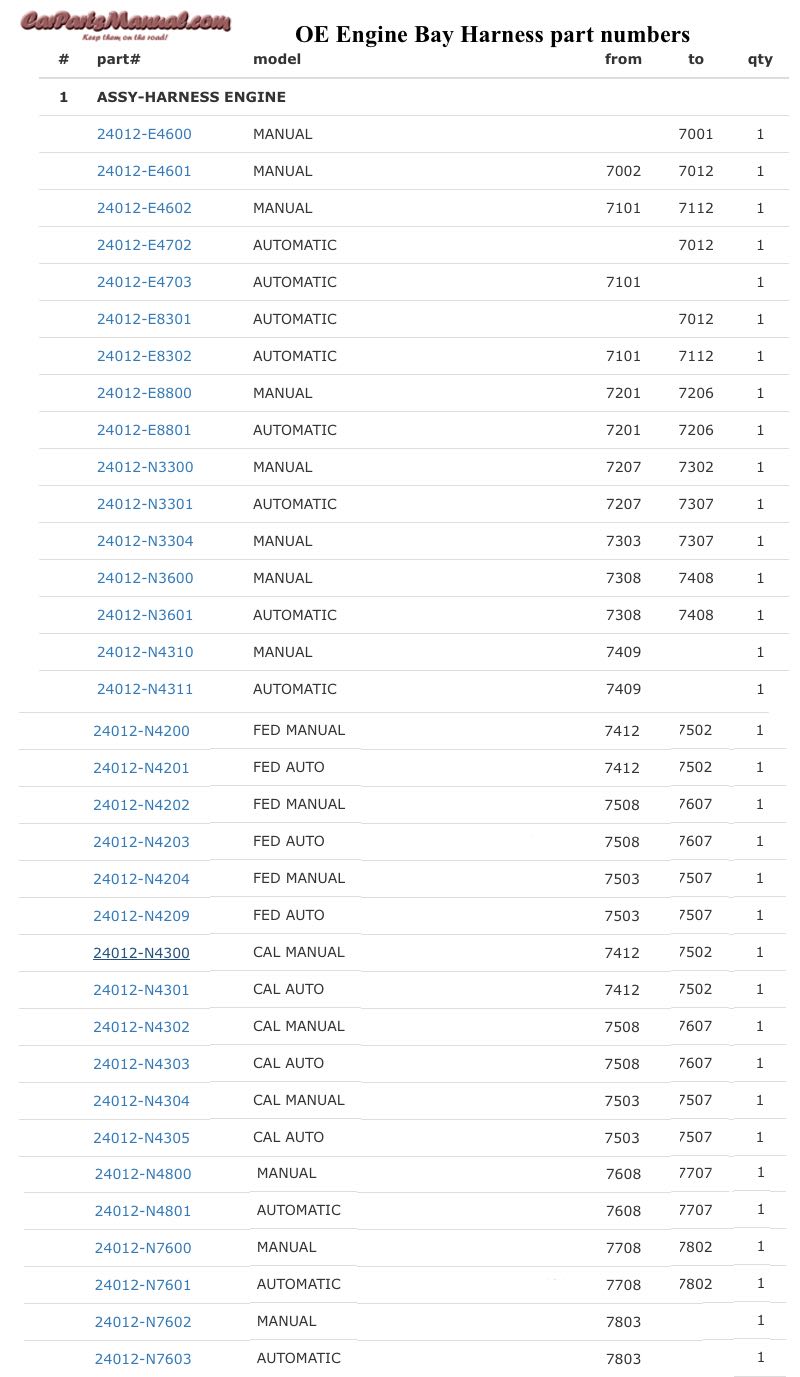
Datsun 240z 260z 280z Factory Part Numbers for Harnesses with Production Dates
Harnesses from different production dates are not compatible. People have asked for me to check the compatibility of harnesses from different productions dates. I would need to have both harnesses and spend about 10 hours looking at both harnesses. I would need to check each connector, each wire at each end and the continuity path of the wires. Now thats a headache. Anything less would be unprofessional and definitely not safe. The Datsun 240z engine bay harness is very similar on the engine side, but all the front connectors that plug into the other harnesses may not match..not to mention the wire colors and circuits. If you need a replacement harness, find your production date on the door id plate and find the harness tape that has the OE part number on it.
These images are from https://www.carpartsmanual.com/datsun/Z-1969-1978/electrical/wiring
Thanks for your great effort, really appreciate all your hard work!

Engine Harness OE part numbers for Datsun 240z 260z 280z
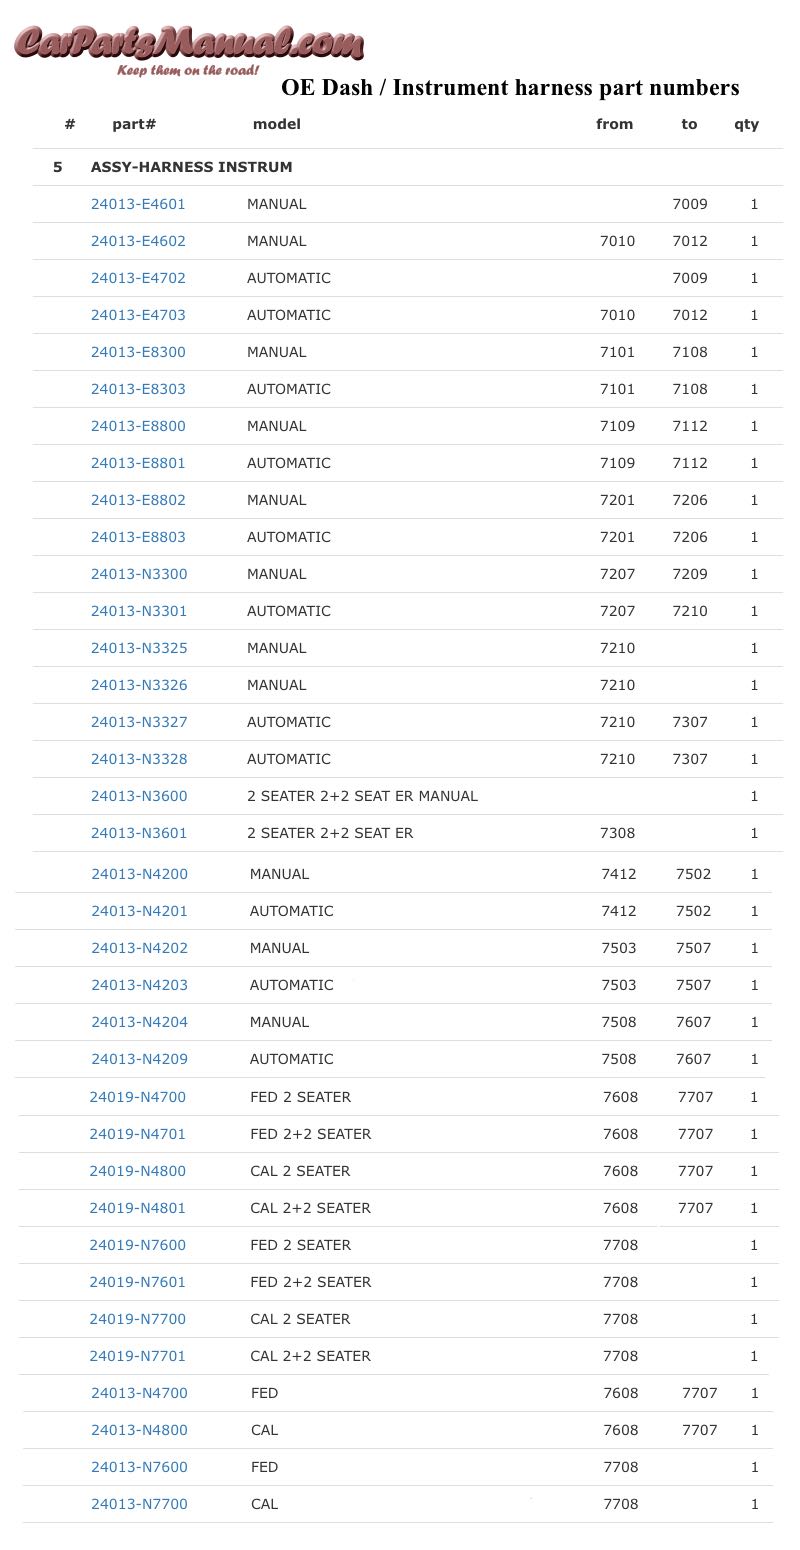
Dash / Instrument Harness OE part numbers for Datsun 240z 260z 280z
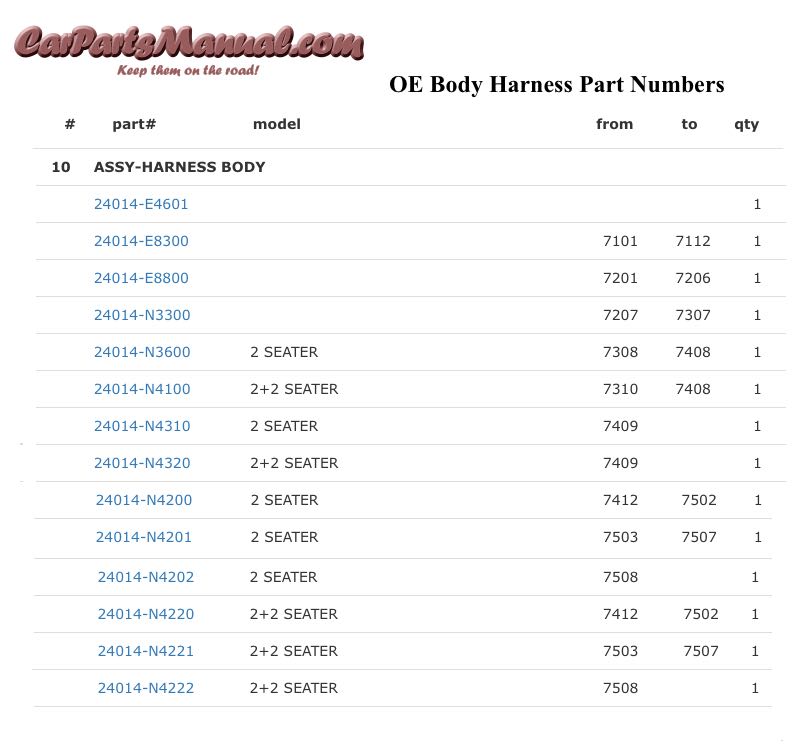
Body Harness OE part numbers for Datsun 240z 260z 280z
Datsun 240z Relays
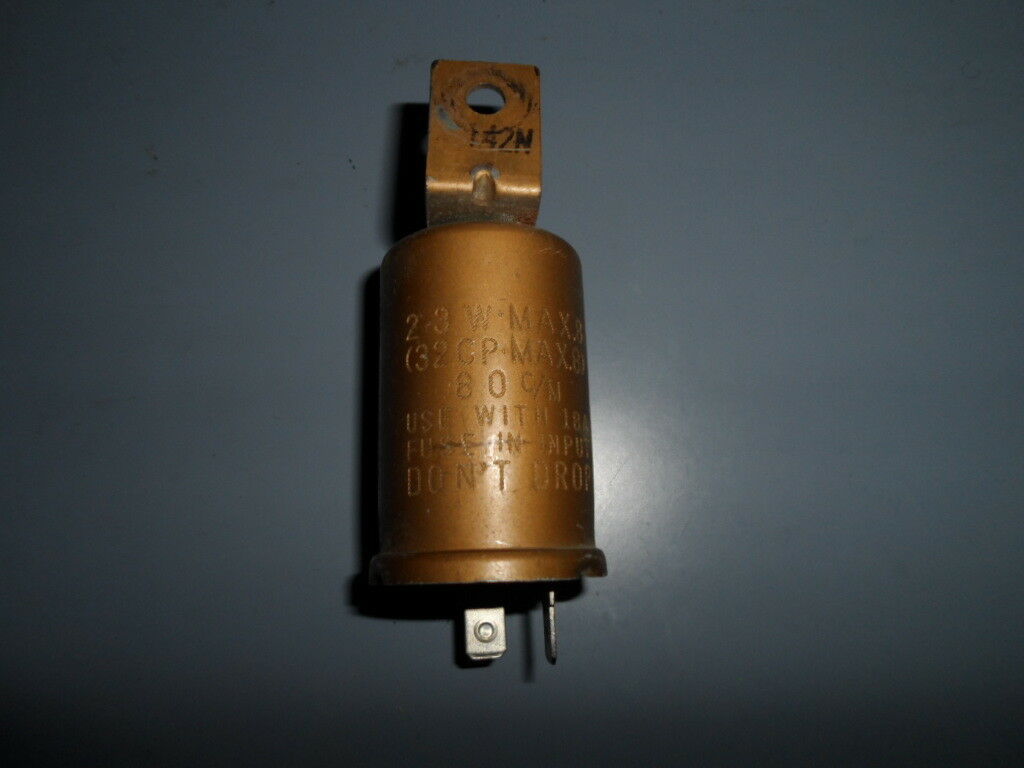
The turn signal / hazard flasher is located under the drivers side dash near steering wheel, usually to the right of steering wheel.
The horn relay is located under the drivers side dash near steering wheel, usually to left of steering wheel.
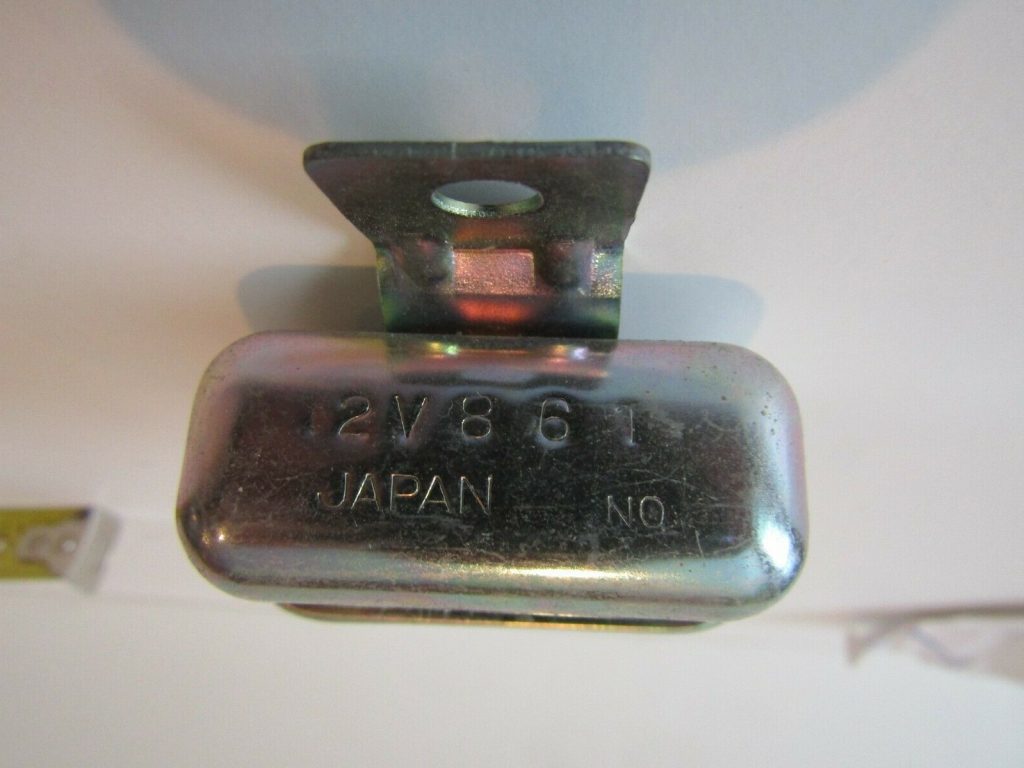

The accessory relay is located on the side panel passenger front, behind it. The thicker wires are the main power wires for the accessories. They drop down from the dash harness on the right side of heater controls. Be sure to check the color of the wires on the relay and the wires that drop downs. If in doubt continuity test them.